Since Order Desk is often used to process orders across multiple locations, time zones, and currencies, a little bit of configuration will be necessary on the Store Settings page to ensure that accurate data is sent to any receiving vendors. Here, we’ll walk through the basic settings that are most critical to the setup process, however you’ll find a walkthrough of more advanced settings here.
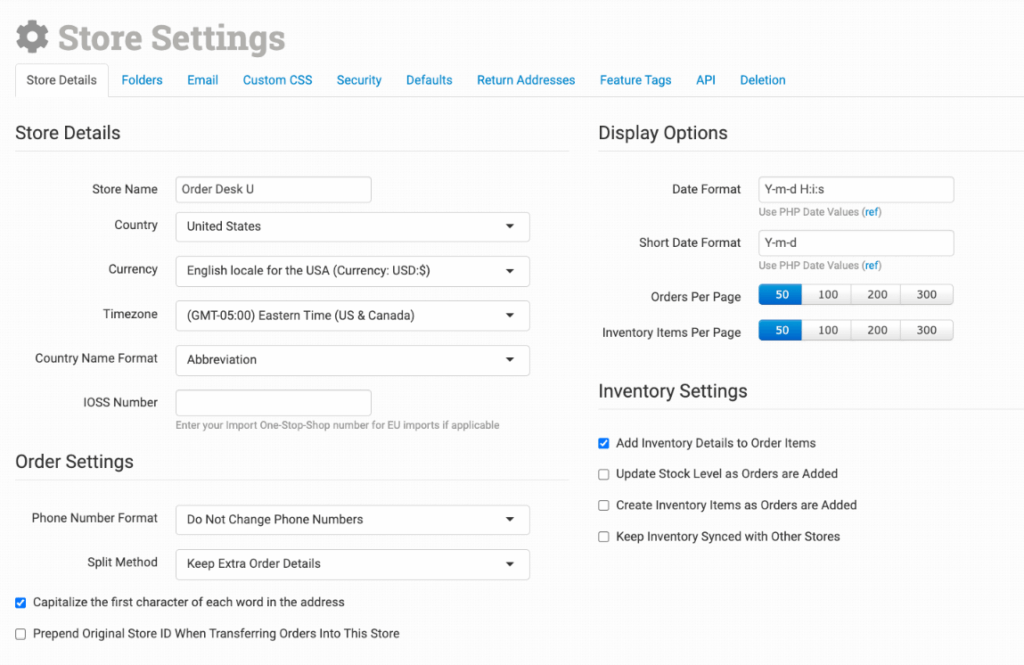
Store Details
Store Name
The store name is the name used in email communication with your customers and in templates throughout the app.
Country
When the store country is properly set, orders that are domestic will not display their country code, but any international orders will. This also helps the EasyPost integration determine what is domestic and what is international for a specific store.
Currency
Use this setting to choose the preferred currency for your orders in your Order Desk store.
Timezone
Set your timezone so that your orders will be displayed with your local time offset.
Country Name Format
Choose how the country name should be formatted in the shipping and billing address field on orders.
IOSS Number
Enter the default IOSS Number that you want to be used for your EU imports, if applicable.
Order Settings
Phone Number Format
Choose how phone numbers are stored with orders.
Split Method
There are two options for Split Method: Keep Extra Order Details or Remove Extra Order Details.
When splitting an order, if you want to keep the extra details of the order (that is, if you want to keep the connection with the source of the order), select Keep Extra Order Details. This way, when split, the new order will be linked to the original order and can still communicate with the source (your shopping cart) where the order came from. The new order will share the original order ID and have -S1 appended to it, for example, #1234 and #1234-S1.
If you want your split orders to be completely separate from their source order, select Remove Extra Order Details, and they will become completely new orders with no connection to the source.
Capitalize the first character of each word in the address
If enabled, this will normalize the capitalization on addresses on orders.
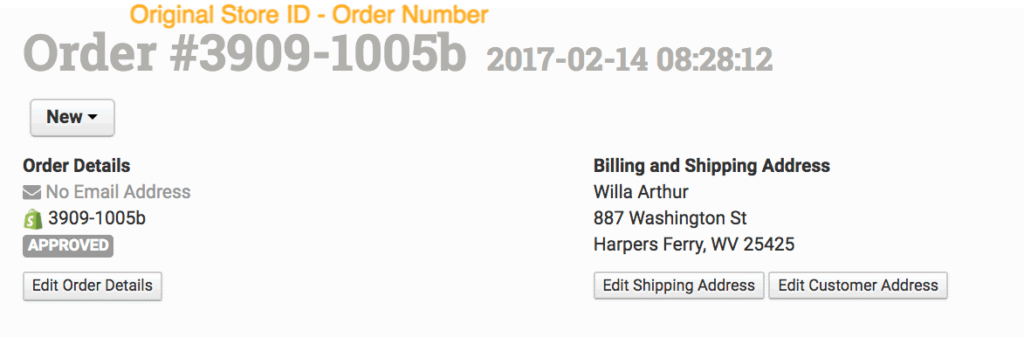
Prepend Original Store ID When Transferring Orders Into This Store
Every Order Desk store has a unique store ID. If Prepend Original Store ID When Transferring Orders Into This Store is enabled, any time orders are copied or moved from another Order Desk store into this store, they will have the original store ID prepended to the order number.
This is especially useful for accounts that move a lot of orders between stores and need to know where they came from at a glance. It will also keep similar order numbers from colliding. For example 2154-1000 and 6548-1000 both had an order number of 1000, but because they came from different Order Desk stores, both can be added into the same store without an order number conflict.
The new order number will look something like this:
Display Options
Date Format
The date format uses PHP date code. For more information and the date code reference, refer to this article.
Short Date Format
The short date format is used in certain integrations to display the date, specifically Authnet, EasyPost Shipment Manager, Stripe Account Details, and MCF Estimated Shipment details.